Setting up your R workspace
With your computing environment all set up, complete with Git configuration, you are now ready to bring the course materials to your local machine as a Git-enabled R workspace. Since these materials live in a GitHub repository, we can leverage Git and GitHub tools to create our own linked and tracked copies of these materials. This both streamlines distribution/update of these materials as well offers practice in working with the GitHub workflow.
Before embarking on this procedure, let’s first examine how exactly material is distributed and used in this course as it’s probably unlike systems you’ve encountered in other classes. First, using the figure below (source), let’s examine what’s what from a schematic perspective. After that, we’ll cover each component in more detail.
Workspace components 
A schematic view
- First, the grey shaded boxes represents GitHub, i.e., items stored remotely in the cloud.
- The cylinders represent repositories, or sets of files related to a project.
- “Them” refers to us instructors, keepers of the class material, and “you” is, well, you, the student.
- The gold cylinder represents the course material provided by us instructors, described below as the “Class” or “Upstream” repository.
- The blue cylinder to its right represents your copy of the class materials, described below as your “Personal”, “Forked”, or the “origin” repository.
- And below the grey box represents your local working environment, i.e, your desktop, laptop, or container that has R, RStudio, and Git installed. i.e. where we actually work with the files. We refer to this repository as your “local” or “cloned” repository.
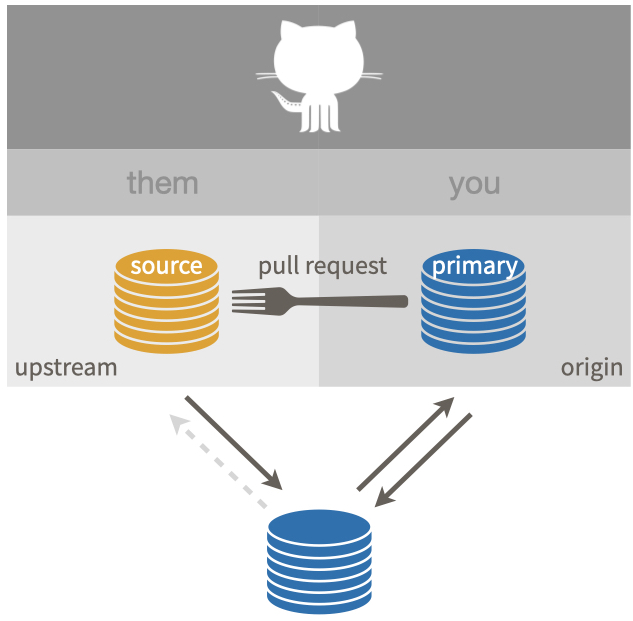
Thus there are three repositories: two residing in the cloud and one residing locally. Now, let’s explore these individually, examining their respective purpose and how they interact with each other.
The repositories
The class (aka “source” or “upstream”) repository
- At the start of the semester, all current class materials reside in the GitHub repository here: https://github.com/ENV872/EDE_Fall2023. You’ll often hear us refer to this as the “class repository” this one repository serves the entire class.
- Students have read-only access to this repository, meaning you can view and access all the files in this repository, but you can’t add or modify them. (Only we instructors can.) This is good since you don’t want to risk messing any files up yourself and having your classmates be upset with you.
- Throughout the course, we instructors will add and perhaps modify files stored in this repository.
Your personal (aka “forked” or “origin”) repository
- Each student will create their own copy of the class repository through a process called “forking”. Thus we refer to this as either a “personal “repository (because each student has their own), or a “forked” repository (because it was create by forking the class repository).
- A forked repository retains links to the repository from which it was forked (the “class” repository in our case, which is why the class repository is also called the “source” repository). These links allow us to compare changes in one repo that don’t appear on the other. For example, if you make a changes to files to your forked repository, it will be “one commit ahead of the source”. Or, if we instructors add a file to the class repository that you haven’t yet pulled into your forked repo, your repo will be “one commit behind”.
- We refer to the source repository as being “upstream” of your forked repository since you can accept, or pull, changes from it, but you can’t readily force (or push) changes “against the current” to the source repository.
- Because this is your personal copy of the repository, you - and you only - have read-write access to this repository via your GitHub account. It’s here in this repository that you keep a cloud-back up of all your work that you can copy, or “clone”, to any local machine.
Your local or “cloned” repository
- Cloning refers to making a copy of a remote repository (i.e. your personal/forked repository on GitHub) on a local machine (i.e, laptop, desktop, or container). We need to do this because we can’t work directly with remote copies of code and data; we need to have them stored locally.
- A cloned repository remains linked to the repository from which it was cloned in a way that makes synchronizing the two easy to do using Git commands.
A word about “branches”
Each repository can be split into branches. Git is complex enough right now, so we aren’t going to deal with branches. However, it’s important that in all three repositories we are working with (the class, your personal forked, and our local repositories), we will be working with the one branch called “main”. You may see in various places references to these with different prefixes. Here’s what they refer to:
origin:mainis the main branch on your forked repository on GitHubupstream:mainis the main branch on the class repository on GitHubmain(no prefix) is the main branch on your local machine
How this all works together: The Git workflow
A. Forking the class repository
So the first step is to create your own personal copy of the class repository. This needs to be done only once.
-
Log into GitHub: https://github.com/login.
If you don’t have an account, you’ll need to create one. It’s free, and if you sign up for the “GitHub Education” program, you get added perks.
 See this link on the Happy Git With R site for additional tips including selecting a username.
 -
Navigate to the class repository: https://github.com/ENV872/EDE_Fall2023.
The class repository contains all the lessons, data, and resources for the semester. We will be modifying it as the class progresses, adding assignments and perhaps revising other materials. It can only be modified by the instructors. Next up, we’ll show the “Git” way to get your own copy of these materials.
-
Fork the class repository (by clicking the green “Fork” button).
“Forking” creates a copy of the class repository in your personal GitHub account: note the web address of the page now has your GitHub username in it.
At this point you have your own copy of all the course materials to date, and exact replica of the course repository since you’ve made no changes. You are fine browsing these files in the GitHub’s web interface. It’s even possible to edit files here, However, WE STRONGLY ADVISE YOU AVOID DOING THIS. Why? Keeping files synchronized across Git/GitHub copies can get quite confusing, and eliminating one place where files get modified makes things just a bit simpler. (Just trust us for now; this will be come more clear in a bit…) In fact, you should only view files using GitHub’s web interface, never modify or try to synchronize files here. Resist the temptation to do so!
B. Cloning your forked workspace
Now that you have your personal copy of the files in your own forked repository, we’ll clone it to your local machine so you can start working with them.
![]() Note, this need to be done once on each new machine you work with.
Note, this need to be done once on each new machine you work with.
- In RStudio, create a new project - either using
File>New Projector in the dropdown in the upper right. - In the “New Project Wizard” that appears, select Version Control, then Git
- For the repository URL, copy and paste the URL of your forked repository (NOT the class repository).
- Accept the default project directory name, but specify (or at least acknowledge) the location where the project folder will live on the local machine.
On completion, the files will be pulled from your forked GitHub repository to your local machine. You are almost ready to get started!
C. Adding a link to the upstream (i.e. the class) repository
We have one last step which is to connect the local repository to the class repository.
![]() Note, this need to be done once on each new machine you work with.
Note, this need to be done once on each new machine you work with.
This is done via a few commands issued at the RStudio terminal:
git remote add upstream https://github.com/ENV872/EDE_Fall2023
git remote set-url --push upstream DISABLE
git remote -v
The first command creates a link to the class repository, naming this link “upstream”. We could name it whatever we want, but “upstream” is appropriate if you imagine the class repository being “upstream” of your forked repository: changes can flow along a current from “upstream” (i.e., the class repository) down to your repository, but not against the current…
The second command disables you from pushing changes upstream. Not really needed since you don’t have permissions to write to the class repository, but perhaps helpful to know about.
And the third command reveals the repos linked to your Git session. You should see two “origin” entries linked to your personal (forked) GitHub repository - one for pulling (‘fetching’) and one for pushing, and two “upstream” entries, with the first linked to the class and the second disabled:
$git remote -v
origin  https://github.com/jpfayEDA/EDE_Fall20233 (fetch)
origin  https://github.com/jpfayEDA/EDE_Fall2023 (push)
upstream        https://github.com/ENV872/EDE_Fall2023 (fetch)
upstream        DISABLE (push)
![]() Note that any changes made to the class repository never go directly to your forked GitHub repository in this set up. Rather, changes are pulled to your local repository and then committed and pushed to the class repository. For consistency’s sake, this will make the process easier.
Note that any changes made to the class repository never go directly to your forked GitHub repository in this set up. Rather, changes are pulled to your local repository and then committed and pushed to the class repository. For consistency’s sake, this will make the process easier.
D. What now?
We now have everything in place; the next step is to put it into practice which you will do in Assignment 1.