Setting Up a Project GitHub Site
We are requiring that you use Git and GitHub for your course project. To accomplish this, on member on your team will need to set up a new GitHub repository and allow others access to this. There will be no forking as all of you will push and pull to the same GitHub repository. Here are instructions to let you set this up.
1. Set up a new GitHub repository
![]() Only one member of your team needs to create the repository. They will then add the others team members as collaborators.
Only one member of your team needs to create the repository. They will then add the others team members as collaborators.
-
Navigate to your GitHub account page on GitHub.com and sign in.
-
Initiate the creation of a new repository by selecting New repository from the
 icon in the upper left of the page.
The remaining steps will follow the figure below… -
Name your repository: **Be sure to include the team member last names in this repository ** (so we can identify who is working on this project).
-
Optionally, give your project a short description.
-
Check the box to Add a README file
-
Accept the other defaults and click Create Repository

2. Add your teammates
- On your new repository’s page, click the
 Settings tab.
 - On the left-hand sidebar, select Collaborators
- Select Add people
- Enter the GitHub names of your other teammates and send invites for them to collaborate
- Your teammates should receive an email shortly allowing them to accept the invitation.
3. Create your own clone of the joint repository
You each now have equal access to the repository and will use it just as you used your forked class repository, with the exception that you need to maintain careful communication with your teammates on who is editing what document when. So the first step is to clone the repository to your local machine. This is done much the way you did your forked class repository. Actually, it’s easier because you don’t have to worry about any upstream remote:
-
In RStudio, create a new project.
-
Set this project to be a versioned controlled project
-
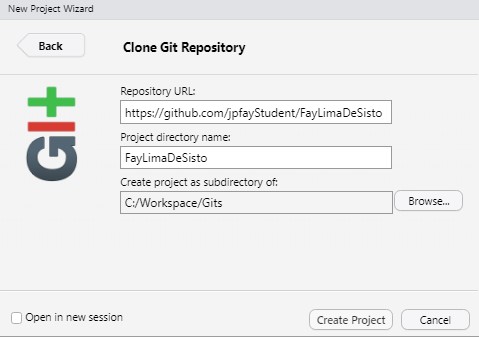
Enter the project’s URL in the dialog as well as the directory name and the location where the local repository will go
You now have your own clone of the repository. You’ll only have to do this once for each machine you work on.
4. Create and edit your code, adhering to the proper sequence of pull, edit, commit, push
-
Always start a coding session by pulling changes from the remote repository. You never know when your teammates have made changes, and you’ll want to have these changes in your code before making your own edits, or else you’re likely to encounter merge conflicts.
-
Tell your teammates when you are making edits to specific documents so they don’t make edits of their own to the same document (and again cause merge conflicts). It’s ok for you to work on separate documents at the same time.
-
When take a pause from working, save any edits, commit those edits, and push them to your remote repository.
And don’t forget to pull when you resume coding!
What if you do encounter a merge conflict??
Merge conflicts happen when changes to a document aren’t linear in time, i.e. when Git is faced with reconciling changes in two separate commits at once. For example, if Student A and Student B both edit Document X at the same time and then push the changed document to GitHub, then Git won’t know which changes to accept. In the end, Git adds both edits to the resulting documents, adding marks (Often >>>>>>) to indicate where the conflicts occur. It’s then up to you to manually edit the file and reconcile the edits. In short, it’s something to avoid.
If it does happen, here’s what to do:
- Git will inform you of a merge conflict and the offending document will include markers where the conflicts occur
- Edit the code manually to (1) remove the markers and (2) adjust the code so it works as you want it
- Commit the changes
- Push to the remote
Of course, it’s seldom that simple. So if it happens, don’t hesitate to reach out for assistance. It’s better to do so early vs searching online and making noble attempts to fix it yourself. Often that just makes for a larger tangle. What’s nice about Git though is that work is seldom lost, just buried under messes of additional commits.
Tips and suggestions
- Separate tasks into different documents. You can merge them later, but working in different documents will lesson the likelihood of merge conflicts.
- If in doubt, commit and push. Better to have more, smaller commits than one large one.
- Don’t hesitate to seek help from the instructors or TAs.